
Need some new inspiration for your holiday cardmaking? Angela’s here today sharing two ideas featuring the Essentials by Ellen Holiday Sprigs stamp set, plus some tips for achieving great results with batch-stamping and die cutting.
Hi friends! It’s beginning to feel a lot like the holidays around here, and I don’t know about you, but I always find myself needing more Christmas cards than I have in my stash. I’ve been making a few extras in order to avoid being left in a pinch, and that includes the two I’ve got here for you today.

The Holiday Sprigs stamp set was one of my favorites in the Essentials by Ellen holiday release, especially because it features solid stamps and line art – perfect if you don’t feel super confident with coloring. I started my craft session by batch-stamping a bunch of images from this stamp set, using Concord & 9th inks in Peacock, Oceanside and Aqua Sky, as well as Catherine Pooler ink in Cranberry and Merlot. I made many more of these than I needed for these two cards, but wanted to have plenty to choose from and plan to use my leftovers on other cards.

Tip: I used to stamp first and then die cut, but lately I’ve found my results for projects like this are much better if I die cut and then stamp. Not only does this method allow me to achieve consistency with the small white margin around my die cuts, but it also means that I don’t have to spend a bunch of time lining up the dies around the stamped images. Here’s my process:
- After creating a bunch of die cuts from plain white cardstock, I place a sticky mat inside my MISTI and secure that leftover cardstock from my die cutting on top.
- Then I place my stamp right in the middle of the negative space and close the MISTI door to secure the back o the stamp on it.
- One at a time, I stick my plain white die cuts into the negative space from which they were cut, just like a puzzle piece. (For example, with my pointsettia-shaped die cuts, I popped each one into the negative space, inked up the stamp, and stamped the image. This way, I don’t have to move the stamp until I’m finished with all of my pointsettias, and can simply pop the die cuts in and out of the same place. The sticky mat also helps to hold them down if I need to do a second stamping.
I kept most of the stamping very straightforward, but in order to add a bit of interest and depth to the pointsettias, I used an ink blending brush to gently apply some Catherine Pooler Merlot ink to the outer edges before stamping. You could certainly do this with an ink blending tool as well, but I find that a small ink blending brush gives me a little more control over where the ink is being placed.
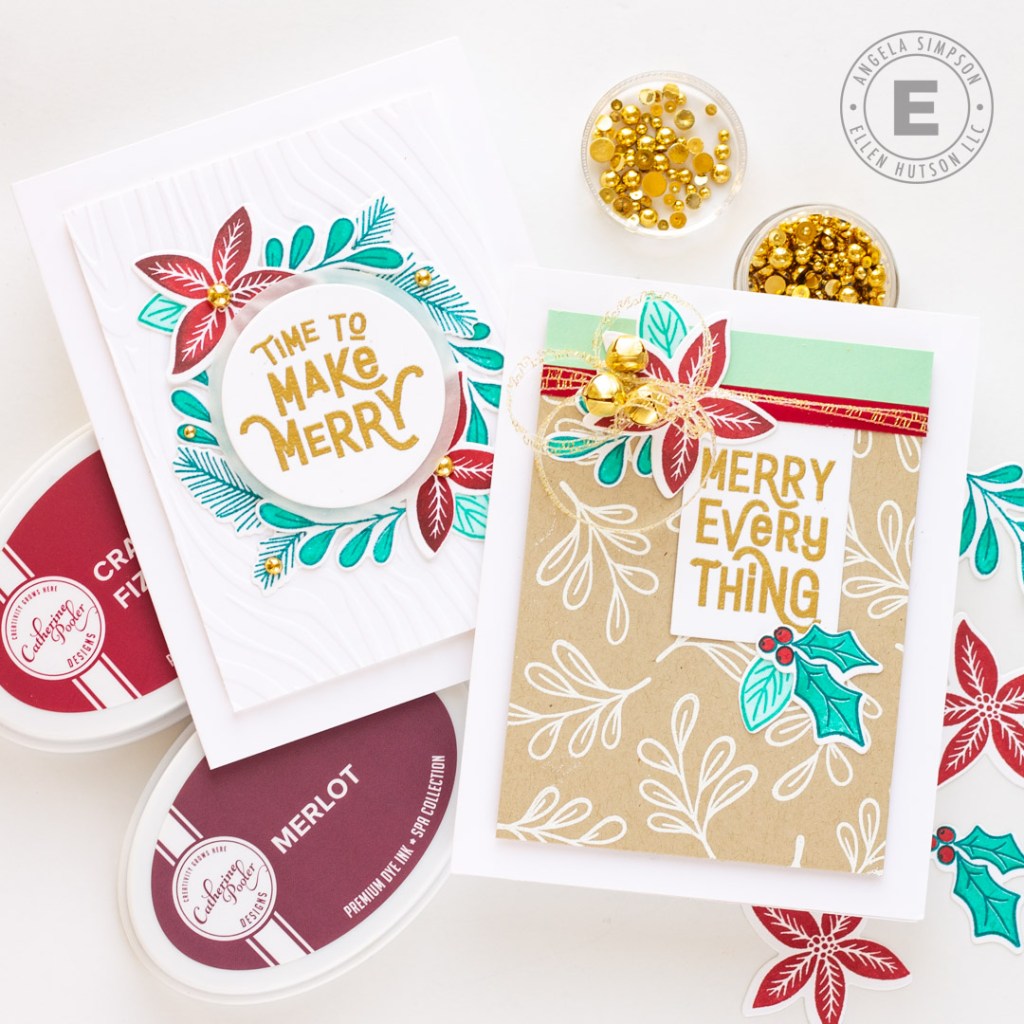
For the first card, I wanted the focal point to be a wreath of holiday sprigs. That meant my background was simple – a white piece of cardstock with texture, thanks to a Woodgrain Embossing Folder. I heat embossed the ‘Time to Make Merry’ from the Retro Holiday Greetings stamp set, then used one of the Essentials Circles to cut it out, along with a slightly bigger circle from vellum.

From here I could see how big my wreath needed to be, and began arranging the die cuts around it. After fiddling around with the placement for a while, I temporarily adhered the pieces in place with Press n Seal, applied adhesive all around the back, and secured the wreath on the woodgrain embossed background. I mounted it on an A2 card base with foam tape, then finished with a few metallic gold pearls.

Moving on to the second card, I wanted to incorporate something that I forget about way too often, which is kraft cardstock! I love the look of kraft with red and white around the holidays, so I used one of the line art sprigs in the Holiday Sprigs stamp set to create a white embossed background.
Tip: My MISTI is used for about 75% of my stamping and embossing, but acrylic blocks are my preference for creating backgrounds like this. I find they give me more freedom to turn my cardstock and rotate the image, and unlike a solid stamp, it’s less-likely that I’d need to re-stamp a line art image.

Working quickly with Versamark embossing ink, I stamped enough sprigs to cover the majority of the panel, applied and heat set my white embossing powder, then went back to stamp and emboss the remaining half. While Versamark embossing ink isn’t super quick-drying, I did my stamping and embossing in 2 batches to ensure the powder would still adhere well to the kraft cardstock.

With the background complete, I added a couple of cardstock strips across the top of the card, another embossed sentiment from the Retro Greetings stamp set, and a few clusters of holiday sprigs. Before mounting the panel to an A2 card base, I wrapped a piece of gold ribbon around the back, tied a bow in the front, then tied in an extra bit of ribbon with 3 small bells threaded onto it. This card will probably need a bubble mailer, but I really wanted to include the bells as an unexpected festive surprise!
So there you have it: two ways to create cards with the Essentials by Ellen Holiday Sprigs stamp set! Thank you so much for stopping by today. I hope you’ve been having as much fun with your holiday cardmaking as I have, and I’ll see you back here soon!


No Comments